Let’s finally begin this build for real.
Long Beam Rifle
These are all the parts needed to build the Beam Rifle:

Though that doesn’t include all these extra parts needed to transform it into Claw Mode:
We start off by building the main body of the gun, which consists of a grey framing piece, covered in white and black armor:

These two components represent the claws when they’re not deployed in Claw Mode:

They attach to the sides of the body like so:

Next, we have this piece, which goes in the back:

It looks kind of like a scorpion’s tail, but it’s really some sort of control arm. It folds inward when in rifle mode:

But then it unfurls when in claw mode:
Extra Parts

This is one of the few bits where I went out of my way to some color correction, painting some of the sections black to make it look more segmented. I’m not really sure if it was worth doing, but I guess it doesn’t look worse either.
This next piece is small, but very important. It contains both the grip, as well as the attachment point for the barrel of the gun:

You have to be careful here. If you don’t fold up the tail/control arm correctly, then it will get in the way of where the grip is supposed to go:

You have to fold it up and in just a bit further, like this:

Now it will fit, in what is literally the last bit of open space:

Last, but certainly not least, we have the barrel. The kit comes with two extremely large color correcting decals to use on both edges:

I had a feeling these were going to look pretty bad, even if properly applied, but I figured I’d try to use them anyway. Almost immediately one of them ripped in two, leaving me with no choice but to paint it instead:

I cannot overstate just how long this barrel is. It’s actually longer than the rest of the gun:
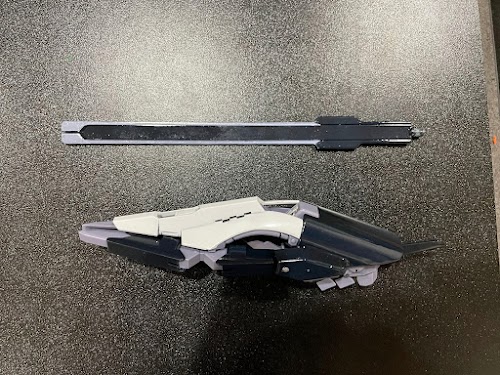
And when you put it together, you get one of the longest weapons I’ve ever seen on a High Grade model:

The only thing that comes close is the Hyper Minovsky Chohoken used by the Tryon 3. But why speculate, when we can measure directly?

The Woundwort puts up a very valiant effort, but the Tryon 3 remains one of, if not the most Extra mobile suit ever made.
Claw Mode
I usually wait until the build is complete to show off a mobile suit’s transformation gimmick, but this is one of, it not the only times I’ve ever had a weapon with transformation gimmick. I’d rather show you how it works now so I can get right to the action poses later.
The transformation process isn’t challenging or difficult, though it does require rejiggering a whole bunch of parts.
-
Take the control arm off, bend it into the shape of a claw, and attach the wire. Eventually this is the part that will attach to the Woundwort's shoulder:
-
Remove the barrel, remove the two "inactive" claws from the sides of the rifle, and move the tip from the front of the grip to the bottom:
-
Take the black armor off the "inactive" claw pieces, and attach them to the "active" claws:
-
Finally, attach the "active" claws to the body, and plug in the other end of the wire:


See? It’s a lot of steps, but they’re all foolproof.
Break Time
I realize we’ve only talked about the Beam Rifle, but this post has already gone on as long as some of my regular build posts. Let’s take a break here, and move on to the body next.