Okay, for my first Star Wars build of the holidays, I chose R2-D2 and BB-8. I’m not going to introduce these two droids, as I’m pretty sure they’re famous enough even within the general popular culture.

I love these two droids, but the question now is - will I like these two models of them?
Based on an initial scan, this looks like your typical Star Wars kit. It has matching sets of waterslide and standard decals, a display stand, and a whole bunch of gimmicks. Each droid has (almost?) every one of their hidden arms/accessories included in the box:

One thing I’m uncertain of is how much of the detail on each droid has to be painted on, and how much of it is achieved through color separated plastic. It looks like all the hidden arms/telescopes/etc need to be painted, but what else?
Of course, there’s only one way to find out. I decided to start the build with BB-8, as I figured he would work well as a warmup.
But first, aside from the new models, I also I got a few new toys as gifts. One of them is this 3d printed runner holder:

I’ve seen these before, but I never thought they’d be worth it. I’ve never had trouble keeping track of my runners by simply stacking them up in the box. But hey, now that it’s here, I might as well give it a shot.
Next, a 3d printed holder for alligator clips:

I like this because of how small it is, but I need more clips if I’m going to make any real use of it.
Now, on to the build!
Here, of course, are the runners:

It looks to me as if the runners are separated by droid. That’s a great idea! It also makes it clear that R2 is much more complicated to build.
Display Stand
I figured I’d build this first, just to get it out of the way.
We get two square-shaped stands that connect together, one for each droid. Each stand is the same size and shape as the one I have for my Boba Fett model, which means that if I wanted to I could string all three of them together as a train of Star Wars models:

For BB-8 in particular, the kit also comes with some clear pieces that create a cradle for him to sit in without rolling around and falling off the stand:

The Head

The head was a simpler build than I expected. It doesn’t use all that many pieces, and there isn’t too much panel lining. And while it does use six decals (a relatively high amount), it turns out that you’re better off using a bit of paint instead. Painting looks better, and it’s both easier and faster.
All the rest of the detail is accomplished through color separated plastic, and it is in this regard that the model really starts to impress. Some of these parts are engineered with extreme precision, and are woven together into tight formations to replicate every little bit of color and part separation found on the movie prop: It is a testament to Bandai’s engineering teams that they are able to accomplish it.

But while this part of the build was simple to work on, it wasn’t simple to assemble. The parts are all engineered to fit so tightly together - so what happens when you apply topcoat, making them even a tiny bit thicker? It leads to some of the parts being a bit tighter of a fit than they’re supposed to be. I ended up with some noticeable gaps between some of the pieces, which I remedied by using super glue and clamps to “squish” them together (I will state that it is entirely possible that this problem actually resulted from me inserting one or more pieces incorrectly).
Here’s what I wound up with when all was said and done:


That definitely looks like BB-8. Or at least a part of him. I shouldn’t be so shocked anymore that every single one of these Star Wars models looks exactly the way they’re supposed to, but I guess I’m still impressed at how well Bandai nails each and every model, whether it be of a ship, a person, or a droid.
A few additional observations about this part of the build:
- I decided I was going to try using the waterslide decals as much as possible, if for no other reason than to get some more practice with them. Worst case scenario, I'll fall back to either standard decals, or paint. With that in mind, I tried using a waterslide for BB-8's "mouth", and it didn't work out. I ended up painting it.
-
All of the “metallic”-looking parts in this kit are molded in that same cheap, toylike color that I complained about when building the [Aug](/posts/2021/12/high-grade-l-gaim-aug/). At first I planned on repainting them all using some kind of metallic paint, but in addition to that being a lot of work, I’m not confident that any of my metallics have the right “look” to them. They’re all a bit too shiny, and they all tend to look awful when doused in matte topcoat.
And so, as an experiment, I tried applying a matte coat directly onto the bare plastic, to see how it might look. The result was surprisingly good. It took away most of the cheap looking sheen, while still looking “metallic” enough.
On the left, a metallic part that's topcoated. On the right, bare plastic - If you look closely at the finished photo of the head, you may notice that some of the white plastic looks ... rough, as if the topcoat began to eat into it. Consider this foreshadowing.

Body
BB-8’s body is, of course, a perfect sphere. But unlike, say, a Haropla, it has a lot more surface level detail. So how exactly do you capture it all? What impact does that have on the assembly of the model?
Let me show you, step by step. First, you start with a cube:

You won’t end up seeing any of this cube in the finished model, but all the pieces of the outer shell will attach to it. Now, if you take a closer look, you may notice some very specifically shaped pegs running along it. These will come in handy later.
Next, we need to build the outer shell. This consists of the six circle-shaped sections that run along the entire body:

Which are assembled by layering parts like so:
Now here is where it gets clever. On the bottom of each of these circles is a specific shape:

These all match up with identically shaped pegs on the cube. This means it is impossible to put them in the wrong place.
Next, there are these curved pieces that “fill in the gaps” between the circles:

I have no doubt that you notice that, once again, the topcoat ate away into the plastic and caused damage. At this point, my theory was that this was the result of me using the last dregs of a nearly-dead can of spraypaint, but I tried spraying some (other) fresh pieces with a brand new can. While the results weren’t quite as bad, they weren’t perfect either. My guess is that it’s the type of plastic used for these parts - it may not play nice with this spraypaint.
For now, I tried to “fix” this by getting out the weathering compount:

Now it looks like caked on dirt.
Once again, there are specially shaped holes in each piece that plug into specially shaped pegs on the cube:
Lastly, we have these triangle-ish shaped pieces that fill in the final gaps at the “corners” of the cube:

Yes, I realize how bad that looks in closeup. I got sloppy painting in the “screwholes”, and the Gundam Marker I used to panel line ended up reacting poorly to the topcoat, forcing me to hand paint the lines. I promise it looks more tolerable from a distance.
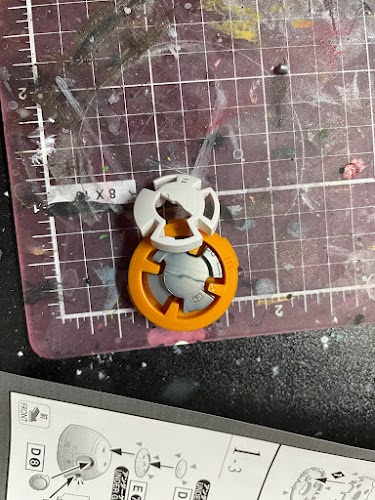
And with that, the body is “complete”, but there are some cool gimmicks we need to take a look at. First, there are the accessories. BB-8 has his little … holder thingie? … that it uses to store important things:

When you look at it from below, you can see the panel that is usually flush with the body (and which conceals the compartment when not in use). That’s a nice little detail that Bandai remembered to include.
Similarly, BB-8 has two different arms. I believe one is supposed to be his lighter, and the other is the welding arm he uses to fix things:

These plug into a different area of the body, and once again they included a special version of the protective flap that looks like it’s been flipped open:

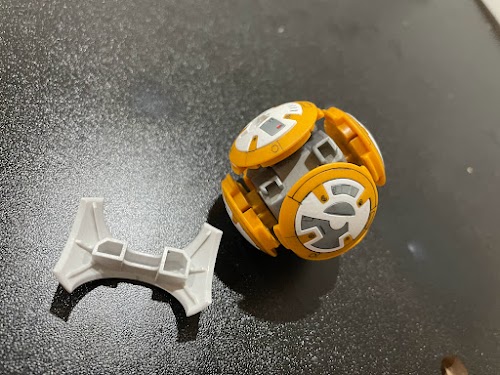
When it comes to attaching the head, you have two choices. One is to attach this piece, which the head plugs right into:

Your second option is to replace that with a smooth, flush piece that has no peg, and instead use the peg that is built into the display stand:

How smart is that!?!?!?!
Personally, I decided to use the peg on the stand, for reasons we will see soon. But first, the completed BB-8:


Up close, you can see a lot of the mistakes I made while detailing. However, from a safe enough distance, I still think it looks pretty good.
Now about that stand. I’ve attached the head to the stand in these photos, and as you can see, you can’t really tell unless you’re looking at it from the rear. That’s a nifty little optical illusion.
But it gets even better than that. The top half of the stand is attached via a peg and socket:

That means the top half can pivot, which means that it can do this:

I was not expecting that, but it is so f*#@ing cool.
Conclusion
What a nifty little kit. They really didn’t leave anything out. Consider me stunned.
Other Thoughts
- Some of the decals on the body of the droid are successfully placed waterslides. I finally found some instructions and tips that worked very well, including:
- Use a dish of hot water with a tiny bit of dish soap. This (allegedly) helps the decal come off the backing paper more easily, and will later help it set better on the plastic.
- Paint a bit of gloss clear coat on the area of the plastic where you wish to place the decal. This is (allegedly) because waterslides adhere better to really slick surfaces, and (again, allegedly) not well at all to bare plastic.
- Soak the decal for at least a minute, as this will make it easier to remove from the backing paper.
- I still had some issues repositioning them once placed, but hopefully that will come with practice.
- This is almost certainly going to be me final assembled build of 2021, so for now, I wish you a happy New Year’s Eve, and I’ll see you in 2022.
