Build Process
Previous models had fairly straightforward build processes. You assembled each limb independently, and attached them all to the torso at the end. The Zeta Gundam, however, is a transformable mobile suit, which has various implications for the build.
For example, the legs need to be able to swing out, so they are attached to the waist via a series of small hinges. Additionally, the head needs to be tucked away when in Wave Rider mode, so the model’s chest is hollow, and the head is attached to a sliding mechanism. As a result, the instructions require you to attach the head to the lower torso before anything for the upper body is constructed.
This unorthodox approach made me realize that I would have to change the way I painted the Zeta. Normally I finish all the parts, spray them each down, and then put together the finished model. However, waiting until the end with the Zeta would mean spraying down the finished mobile suit all in one go. Since I didn’t want to do that, I decided to put my work on the torso on hold, and switch to building accessories until I could get my hands on some paint.
Accessories
The Zeta Gundam has no bazooka, and thus features a smaller set of accessories than earlier kits. Some fans criticized Bandai for shorting this model a weapon, citing the fact that it is technically missing one - namely the Hyper Mega Launcher. Apparently, you can buy it as a separate accessory, but I don’t feel the need. Its size would limit the model’s posability, as well as force it to take up too much space.
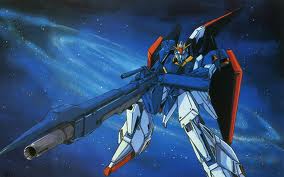
Beam Rifle
The Beam Rifle is pretty sweet. It’s much longer than the ones wielded by my previous Gundams, which gives it the appearance of something meant to inflict maximum damage. It’s also multi-purpose; the barrel can be shortened for when the suit is transformed, and you can attach a Beam Saber blade to the muzzle as if it were a bayonet.

Shield
The Zeta’s shield doubles as its nose cone when in Wave Rider mode, making it the narrowest thing I have ever seen classified as a shield. I’m not really sure how much protection it would offer in combat, though I do like the way it attaches to the model’s wrist.

Clearcoat
I tried something new when it came time for painting. I covered our patio table entirely in newspaper, so I could lay each piece down and spray directly on it. I thought this would solve the paradox of placing wet paint on a surface in order to let it dry. In this regard it certainly helped; sadly, what it can’t help with is bad technique, which I seem to have.
Case in point - after multiple passes, the paint on the beam rifle continued to look spotty and uneven. In my frustration, I made one more pass, slow and up close. Rather than getting a nice matte finish, the rifle looked like it was drenched in gloppy, shiny gunk. I ended up having to scrape most of it off after it dried, such that the paint job now looks patchy.
The excess paint also ruined some of the gold foil decals, which I had to remove and “replace” by filling in the area with a gold colored Sharpie. Right now, the rifle looks pretty bad. If I could get an even coat of paint, I think it could be salvaged, but it never should have gotten to this point in the first place.
So what went wrong here? At the time, I foolishly blamed the kit, believing that the paint just wasn’t willing to hold to the plastic. In reality, I don’t think I’m spraying correctly. I don’t want to get too close, but I might be moving too far, and when I spray, I violently rattle the can side to side, which is likely sending the paint every but where I want it to go. I may go back to my old approach.
The Head
Before building the model’s head, I tried laying down all of its tiny, component parts and spraying them down in one fell swoop. That was a bad idea, as the force of the paint stream pushed them all around and almost blew them all away. I ended up holding each piece up with tweezers and giving it a quick spray.